Integrating SDLB with Databricks
The Databricks platform provides an easy accessible and configurable way to implement a modern analytics platform. Smart Data Lake Builder complements Databricks as an open source, portable automation tool to load and transform the data.
In this article, we describe the seamless integration of Smart Data Lake Builder (SDLB) in Databricks Notebooks, which allows you to:
- Run and Modify SDLB Pipelines directly in Databricks
- Display contents of DataObjects in your Notebooks
- Use code completion to browse through Actions and DataObjects
- Execute individual Actions from a Notebook Cell
We will use our getting-started guide as an example data pipeline. This will download data about airports and plane departures and do some calculations. Feel free to check out our guide for a step-by-step walkthrough on what it does.
Before jumping in, it should be mentioned that there are also many other methods to deploy SDLB in the cloud, e.g. using containers on Azure, Azure Kubernetes Service, Azure Synapse Clusters, Google Dataproc... The method described here provides the advantage of having many aspects taken care of by Databricks like Cluster management, Job scheduling and integrated data science notebooks. Also, the SDLB pipeline that is described here is just a simple example, focusing on the integration into the Databricks environment. For a detailed list of what SDLB can do, see Features.
Let's get started
-
Databricks Setup
Databricks accounts can be created in various ways. This guide has been tested using a Free Trial with the AWS backend. For this, we created an account using an email-address with Root User sign in. Then, we used the Workspace stack by using Quickstart as described in the documentation. Then, we simply launched the Workspace and can kept all default options.Conceptually, there are no differences to the other providers. If you already have an Azure, AWS or Google Cloud account/subscription this can be used, otherwise you can register a trial subscription there.
-
Cluster Setup
In the Databricks UI, create a compute cluster. Pay attention to the following settings:-
Databricks Runtime Version. This needs to match the Spark and Scala versions of SDLB. When writing this post, we used15.4 LTS (includes Apache Spark 3.5.0, Scala 2.12), together with SDLB Version2.7.1. Note that only the major and minor versions must match, patch versions can differ. For example, SDLB Version2.7.1uses Spark3.5.2with Scala2.12.15. Alternatively, there are other SDLB builds for different Spark versions, see also Architecture for supported versions. -
We want to use Java Version 17, which is not the default in Databricks as of December 2024. To use Java 17, do this: Under
Advanced optionsin theSparktab, add the following line to theEnvironment variablesfield:JNAME=zulu17-ca-amd64
-
-
Catalog Setup
Setup a Catalog to store our data.- Go to the
Catalogmenu and create a new catalog calledmy_catalog. You can pick catalog, schema and volume names to your liking but just make sure that they are in sync with the contents of the environment config template file. - In the
defaultschema, create a newmanaged volumecalledgetting-started. - Why do we need a volume? Because we need a place to store the Jar-File (Java Archive) of SDLB, as well as files storing the state of SDLB runs. This place needs to be accessible from the Spark Cluster Nodes (Driver and Executors), as well as from any Databricks Notebook. Volumes are great for managing data like that.
- Go to the
-
Get the code and run Part 1 of the Notebook
- In your
Workspace, click onCreate->Git folder. In the field calledGit repository URL, enterhttps://github.com/smart-data-lake/getting-started.gitand selectGithubasGit Provider. Check out the code of ourgetting startedon themasterbranch. - Open the notebook called DatabricksDemo. You will notice that the first cell lets you set some parameters:
REPODIR: The location in Databricks were you checked out your repository. You can simply copy/paste the path of thegetting-startedfolder that you checked out using the button in the Databricks UI as follows: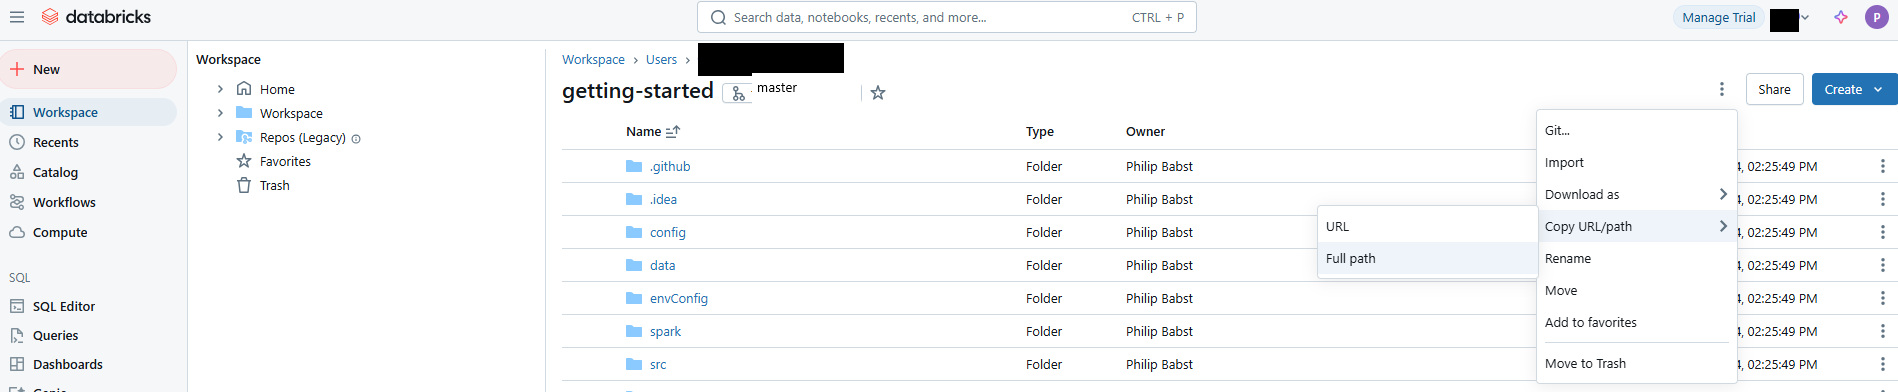
TMPDIR: A location for temporary files, needed by maven (Java build tool) when running the Notebook the first time. You can keep the default.VOLDIR: The Databricks Path to thegetting-startedvolume that you just created.Runthe first cell to have the buttons appear. Then, fill the 3 parameters REPODIR, TMPDIR, VOLDIR with your values- Now click on
Run Alland use the Cluster created above. - The next cells in the notebook should run correctly. Maven will create the
getting-started-with-dependencies.jarin the volume. - Then the Cell below
Convert the HOCON Config Files to Scala Classeswill fail with the messageerror: object smartdatalake is not a member of package io. This is because the Cluster does not yet have access to the SDLB Jar-File...
- In your
-
Install getting-started-with-dependencies.jar
- Back on the
Computepage, select your cluster and edit it. UnderLibraries, selectInstall new, then choosegetting-started-with-dependencies.jarin thegetting-startedvolume. Restartthe Cluster so that the new Library gets imported.- Now, the next cell in the notebook should run succesfully.
- The final 2 cells are still not working, because there is no data to display yet.
- Back on the
-
Run getting-started as a Databricks Job
Let's get some data. In theWorkflowstab, click onCreate Joband underTasksclick on+ Add task.Task Name: Run_all_actionsType:JARMain Class:io.smartdatalake.app.DefaultSmartDataLakeBuilder- add
Dependent Libraries: selectgetting-started-with-dependencies.jarin thegetting-startedvolume. Clusterselect your clusterParameters: Replace the placeholders REPODIR and VOLDIR with the ones you have set.[ "-c","file:///REPODIR/config,file:///REPODIR/envConfig/dev.conf","--feed-sel",".*","--state-path","VOLDIR/state","-n","getting-started","--parallelism","2" ]Launchthe job. This can take a minute or two.- When finished, all cells in the noebook will be working.
-
Results
- You can observe the available DataObjects and Actions using our UI Demo. Feel free to checkout out our blog post for more information on the UI.
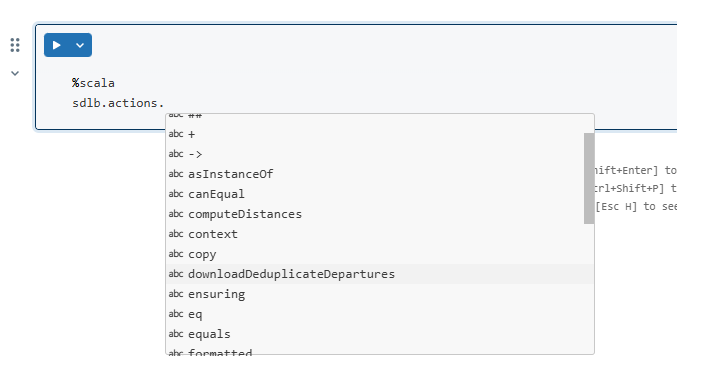
- You can also browse through the DataObjects and Actions as illustrated in the Notebook. From now on, it's enough to execute the current cell to get immediate feedback. You don't need to run the steps before
Try SDLB Lab interfaceagain. - If you want to use code completion, start typing something and hit CTRL + SPACE. Like that you can browse the DataObjects and Actions of SDLB.
- Finally, you can directly edit the config files in the
Workspaceunder REPODIR/config und re-run your job with your changes, directly within the databricks environment. If you want the SDLB Interface to reflect your changes to the config, simply re-run the cellConvert the HOCON Config Files to Scala Classes. Note that the files that end with .*solution are ignored by SDLB, they are just there for people following thegetting-startedguide.
Summary
We have seen how fast it is to get a working Analytics Environment with Databricks and how easy SDLB is integrated.
SDLB Job scheduling, Configuration changes and interactive Development in Notebooks with SDLBs DataObjects and Actions is easily accessible through the Databricks Workspace!
Let us know if that worked for you too!